Ubacoda.com is an independant developer of mobile applications. Welcome to the ubacoda.com blog!

Magic Mouse is a Hit with Me

Mon Dec 14 01:15:30 2009

I wrote a post a few weeks back about the new Apple Magic Mouse and said that if I ever got one of my own, I would write about my experiences. Well, it was my birthday recently and my dear ol' mom actually forked out for one for me. My first impression when I got it was how well presented it was, which I suppose is nothing new where Apple is concerned. The design of the mouse is very sleek and it doesn't feel as round or as bulky as it's predecessor - the Mighty Mouse.

The scroll functionality works flawlessly but with an added feature that I was unaware of until I got my hands on it. The mouse can actually detect how fast your finger scrolls across it's shiny surface and it will scroll accordingly, which is great when you want to get to the end of a long web page really fast in one quick swipe of your finger. The way it scroll kind of reminded me of how the iPhone scrolls as that also detects the speed of your scroll.

At the bottom of the mouse are two black extrusions kind of like skiis which raise the mouse a good 3mm from whatever surface you are using it on. The Might Mouse, however, was rather low and often allowed dirt or pencil rubbing to get trapped underneath (Yes, I know I should clean my desk more often) hindering the movement of the mouse.

The two silly buttons at either side of the Mighty Mouse, which in my opinion did more harm than good as my clumsy fingers would often press them by mistake, have been removed too. In the end, I chose to turn them off with the Mighty Mouse, but with the Magic Mouse, that's not a problem anymore.

One thing that I have found that I miss is the ability to press the very center of the mouse (scroll ball on Mighty Mouse) and have the daskboard widgets show. With the new Magic Mouse, there is only a left and a right click, so I guess Magic Mouse users will have to press F12 to bring the daskboard up for now.

Anyway, in conclusion, if you're thinking of buying one, I would strongly recommend it. It's a very simple mouse, and although I'm not sure it quite justifies the price, it will certainly be one of the better mice you've had for your apple computer.

Parsing XML with AS3 and E4X

Thu Dec 3 04:27:03 2009

Compared to AS2 parsing XML in ActionScript 3 is a dream, since it uses E4X (ECMAScript for XML) which is a programming language extension that gives AS3 native support for XML. Once an XML file is loaded, pulling specific data out of the returned xml data is a sinch. Also, I've added a bonus class that will make parsing XML even easier. You don't want to miss this one.

First off, take a look at this.

package
{	
   import flash.display.*;
   import flash.events.*;
   import flash.net.*;

   public class NormalParsing extends MovieClip
   {
      private var ldr:URLLoader = new URLLoader();
      private var xml:XML;
      private var xmlList:XMLList;

      public function NormalParsing()
      {
         ldr.load(new URLRequest("bin/data.xml"));
         ldr.addEventListener(Event.COMPLETE, loaded);
      }

      private function loaded(event:Event):void{
         xml = XML(event.target.data);
         xmlList = xml.children();

         trace("*************** XML ***************n"+xml);
         trace("*************** XMLList ***************n"+xmlList);
      }

   }
}

The above code is all the code you need to load a xml file using ActionScript. Here's how it works. First we create a new URLLoader instance on line 9 and inside the constructor function we load a new URLRequest passing in the string "bin/data/xml", which is the location of our XML file (lines 15). We add an EventListener (line 16) to the loader and listen for the COMPLETE event which will call the loaded function on line 19 once the XML file has been fully loaded. The XML file itself may only take a few milliseconds to load but trying to access any properties or functions that involve the information being loaded before the information is fully available will more often than not cause errors of doom, so make sure that you add the listener and wait for the load to complete. Finally, with all the data loaded we put the XML data returned into the xml variable defined on line 20 and the children of the XML (xml.children()), which is another way of talking about the XMLList, inside the xmlList variable define on line 21.
After that, the information can then be accessed from inside those two variables as the trace statements at the end of the loaded function prove.

The structure of the XML is the same as the XML file used in the jQuery XML parsing example in a previous post. There is a list tag, inside of which are a few item tags including an 'id' attribute. Each item tag holds a head and url tag. So how do we access this information specifically. The answer is simple. We use E4X.

For example, if we wanted to access the 'id' attribute from the xml variable, we would use the following syntax.

xml[n].attribute("attribute name");

The number written in place of 'n' represents the position inside the XML and this always starts at 0. Therefore, if we wrote xml.item[0].attribute('id'); inside of a trace statement, the first 'id' attribute value would be returned, which in this case is "1"; If we wrote xml.item[2].attribute('id');, the attribute value "3" would be returned.

To access the head tags in the XML, we would use the following syntax.

xml.item[0].head //returns CuluCulu Flash
xml.item[3].head //returns Gakushu Support Juku

To return the url tag we would use the following syntax.

xml.item[0].url //returns http://www.culu-culu.com/culuculu/flash
xml.item[3].url //returns http://www.supportjuku.com

Parsing XMLList data is done in a very similar way, but this time we will be replacing xml.list[n] with xmlList[n]. Also, to access the 'id' attribute in the XMLList you would use an @ mark instead of the word 'attribute' as was the case when accessing attributes in XML data. For example:

xmlList[2].url //returns http://www.supportjuku.com
xmlList[0].@id) //returns 1 

As you can see, E4X is a very powerful tool and is one that will take your coding leaps and bounds.
To finish off though, I would like to introduce you to a quick class I whipped up that uses a public static function to parse XML data, meaning that it doesn't require instantiation. You can download my XMLParsing class here.

It's implementation is very straight forward. Simply import the class using the statement import XMLParsing and then use the remote method to pass in the url to your XML file, and finally add an EventListener to listen for the complete call. Example code is as follows.

import XMLParsing;
XMLParsing.remote("data.xml");
XMLParsing.addEventListener(Event.COMPLETE, init);

function init(event:Event):void{
   trace(XMLParsing.xml);
   trace(XMLParsing.xmlList);
}

As you can see from the code above, you can access the xml and xmlList variables to access whatever data you want. When working on big projects, however, it might be a good idea to store these variables inside variables of the class importing the XMLParsing class, as a new remote call will change the data stored in the XMLParsing class. So, there you go. I think some of you may find it useful. Let me know how you get on. All files for this post can be download here
Parsing XML using jQuery

Mon Nov 30 01:56:20 2009

I have found that being able to parse XML is one of the most useful things a programmer can learn. It allows you to store a lot of information in one place and easily edit it without the need to update your program or website itself. The effects on a website can be astounding.

Today, for those who don't know, I would like to show you how to parse XML files using jQuery. First, you will need an XML file. XML is a markup language and uses tags very similar to HTML tags. The major difference with XML tags is the fact that you get to choose the names of your tags.

I have created an xml file which will be a list of the websites I have recently created. The code is as follows:

<list>
	<item id="1">
		<title>CuluCulu Flash</title>
		<url>http://www.culu-culu.com/culuculu/flash</url>
	</item>
	<item id="2">
		<title>CuluCulu HTML</title>
		<url>http://www.culu-culu.com/culuculu/html</url>
	</item>
	<item id="3">
		<title>Gakushu Support Juku</title>
		<url>http://www.supportjuku.com</url>
	</item>
	<item id="4">
		<title>Yokkaichi College of Information & Languages</title>
		<url>http://www.ssc.ac.jp</url>
	</item>
	<item id="5">
		<title>Tomojiro's Music Studio (v.2)</title>
		<url>http://www.musictomo.com</url>
	</item>
</list>

As you can see, inside the <list> tags there are five sets of <item> tags, each containing a <title> and a <url>. What we want to do is parse the information in <title> and <url> tags, which will allow us to create links. This is usefull to use for example in creating a sitemap for a list of urls to display on our website. Imagine you have 50 links you would like to display. Writing them out is quite a feet, let alone updating them. With a little jQuery, all of this becomes very simple.

<script type="text/javascript" charset="utf-8">

   $(document).ready(function() {
      $.ajax({
         url: "sites.xml",
         dataType: "xml",
         success: function(xml) {
  
            $(xml).find('item').each(function() {
               var id = $(this).attr('id');
               var title = $(this).find('title').text();
               var url = $(this).find('url').text();							
               $('#content').append("<p>"+id+") <a href= "+url+">"+title+"</a></p>");
            });

         }
      })
   });

</script>>

Ok, so here's what's happening. We start off with the jQuery ready function (line 3) which initiates everything. Then, using the $.ajax() method we tell jQuery to look for the sites.xml file (line 5) and give it the dataType: "xml" so that it knows what kind of file we are dealing with (line 6). When jQuery has succeeded in finding and loading the file, it will call the anonymous inline function on line 7 and this is where we get to write what is going to happen with the information we have parsed.

On line 9 we loop through each of the <item> tags and store the information inside the <id>, <title> and <url> tags inside variables (lines 10 ~ 12).

To find attributes we use $(this).attr('xx'); where ('xx') is the name of the attribute we are looking for, which in this case is 'id' on line 10.

Finally, we use the info stored in each variable to output a little html inside the <div> tag with an id of 'content' using HTML() on line 13, which in this case places the information inside a href to create links. The output is as follows:

Recent Work

1) CuluCulu Flash

2) CuluCulu HTML

3) Gakushu Support Juku

4) Yokkaichi College of Information & Languages

5) Tomojiro's Music Studio (v.2)

So there you go. Try it out and let me know how you get on. I also intend to write a post on AS3 xml parsing using the infamous E4X syntax, which is a delight to use. Until then, happy jQuery parsing!

My Favourite TextMate Bundles

Tue Nov 24 02:35:10 2009

This post is purely to list a few tmbundles that I use daily when coding. For anyone who hasn't got these yet, I really recommend you check them out. So here goes:

1. Flex and AS3 bundles found at Simon Gregory's blog

2. HTML and CSS bundles from Minimal Design

3. and finally a great jQuery bundle from Learning jQuery

There you have it. Check 'em out coders!

'As-you-type Output' in jQuery

Sun Nov 22 07:03:46 2009

As some may have already gathered, I am actually programming this blog myself. The main reason is that I think that I can learn a lot from doing so. Plus, it gives me a getaway project when other work is stressing me out and I don't want to be away from coding. As a side note, I have tried WordPress and I think it is truly amazing and thoroughly recommend it.

Anyway, today I would like to share some more code with you. While working on this blog, I found I needed something that would help me get a sense of what the finish post would look like while I typed, so I developed an editor using jQuery to do just that.

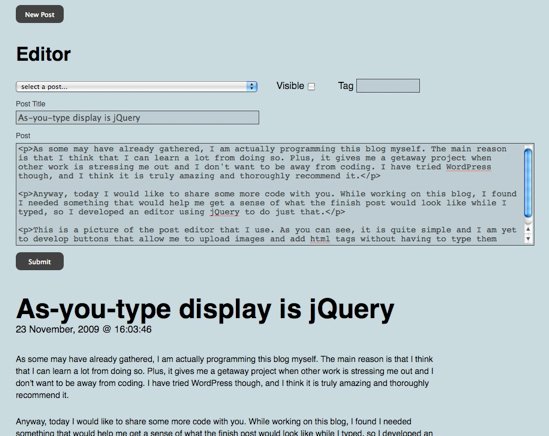
The picture below is of the post editor that I use. As you can see, it is quite simple and I am yet to develop buttons that allow me to upload images and add html tags without having to type them myself, but for now, it does what it was meant to.

Basically, below the input area is an output area which displays the the post as it will look once posted. The display area also updates on the fly as you type. I have written a small example below since I can't actually give you access to the editor for obvious reasons.

Type in the box and watch it get displayed below: (Note*30 letter limit)

Output:


I set up an input textfield with an id of "typerArea" and a p-tag with an id of "showType". If you are trying this, you will also have to download jQuery and place it in the same directory and the html file or whatever file type you are coding in. The jQuery code is as follows:

$(document).ready(function() {
   $("#typerArea").keyup(displayType);
				
   function displayType(){
      var contents = $("#typerArea").val();
 	$("#showType").html(contents);
   }
 });

As usual in jQuery, once the document is ready (line 1), the "typerArea" textfield is set up to receive a keyup event (line 2) so that after every keystroke (up state) the function displayType() (line 4) will fire. This in turn takes the contents of the typerArea textfield using jQuery's val() function and places it inside the variable 'contents' (line 5), which then gets passed as the HTML of the paragraph "showType". Quite straight forward stuff, but fun none-the-less.

If you are interested in downloaded the example file you can find that here

Most recent posts

  1. Flashcards Maker - the app the helps you learn in a flash
  2. Convert Font Suitcase to TTF in 3 Easy Steps
  3. Rain or Shine - Weather Forecast Available Now!
  4. Getting around Apple's silly rules for iOS 10
  5. Localising App Names for iOS and Android

Search site:

Apps by Ubacoda.com

Click the app icons to see more info


Archives

Categories