Archives for November 2009...

(6 results found)

Parsing XML using jQuery

Mon Nov 30 01:56:20 2009

I have found that being able to parse XML is one of the most useful things a programmer can learn. It allows you to store a lot of information in one place and easily edit it without the need to update your program or website itself. The effects on a website can be astounding.

Today, for those who don't know, I would like to show you how to parse XML files using jQuery. First, you will need an XML file. XML is a markup language and uses tags very similar to HTML tags. The major difference with XML tags is the fact that you get to choose the names of your tags.

I have created an xml file which will be a list of the websites I have recently created. The code is as follows:

<list>
	<item id="1">
		<title>CuluCulu Flash</title>
		<url>http://www.culu-culu.com/culuculu/flash</url>
	</item>
	<item id="2">
		<title>CuluCulu HTML</title>
		<url>http://www.culu-culu.com/culuculu/html</url>
	</item>
	<item id="3">
		<title>Gakushu Support Juku</title>
		<url>http://www.supportjuku.com</url>
	</item>
	<item id="4">
		<title>Yokkaichi College of Information & Languages</title>
		<url>http://www.ssc.ac.jp</url>
	</item>
	<item id="5">
		<title>Tomojiro's Music Studio (v.2)</title>
		<url>http://www.musictomo.com</url>
	</item>
</list>

As you can see, inside the <list> tags there are five sets of <item> tags, each containing a <title> and a <url>. What we want to do is parse the information in <title> and <url> tags, which will allow us to create links. This is usefull to use for example in creating a sitemap for a list of urls to display on our website. Imagine you have 50 links you would like to display. Writing them out is quite a feet, let alone updating them. With a little jQuery, all of this becomes very simple.

<script type="text/javascript" charset="utf-8">

   $(document).ready(function() {
      $.ajax({
         url: "sites.xml",
         dataType: "xml",
         success: function(xml) {
  
            $(xml).find('item').each(function() {
               var id = $(this).attr('id');
               var title = $(this).find('title').text();
               var url = $(this).find('url').text();							
               $('#content').append("<p>"+id+") <a href= "+url+">"+title+"</a></p>");
            });

         }
      })
   });

</script>>

Ok, so here's what's happening. We start off with the jQuery ready function (line 3) which initiates everything. Then, using the $.ajax() method we tell jQuery to look for the sites.xml file (line 5) and give it the dataType: "xml" so that it knows what kind of file we are dealing with (line 6). When jQuery has succeeded in finding and loading the file, it will call the anonymous inline function on line 7 and this is where we get to write what is going to happen with the information we have parsed.

On line 9 we loop through each of the <item> tags and store the information inside the <id>, <title> and <url> tags inside variables (lines 10 ~ 12).

To find attributes we use $(this).attr('xx'); where ('xx') is the name of the attribute we are looking for, which in this case is 'id' on line 10.

Finally, we use the info stored in each variable to output a little html inside the <div> tag with an id of 'content' using HTML() on line 13, which in this case places the information inside a href to create links. The output is as follows:

Recent Work

1) CuluCulu Flash

2) CuluCulu HTML

3) Gakushu Support Juku

4) Yokkaichi College of Information & Languages

5) Tomojiro's Music Studio (v.2)

So there you go. Try it out and let me know how you get on. I also intend to write a post on AS3 xml parsing using the infamous E4X syntax, which is a delight to use. Until then, happy jQuery parsing!

My Favourite TextMate Bundles

Tue Nov 24 02:35:10 2009

This post is purely to list a few tmbundles that I use daily when coding. For anyone who hasn't got these yet, I really recommend you check them out. So here goes:

1. Flex and AS3 bundles found at Simon Gregory's blog

2. HTML and CSS bundles from Minimal Design

3. and finally a great jQuery bundle from Learning jQuery

There you have it. Check 'em out coders!

'As-you-type Output' in jQuery

Sun Nov 22 07:03:46 2009

As some may have already gathered, I am actually programming this blog myself. The main reason is that I think that I can learn a lot from doing so. Plus, it gives me a getaway project when other work is stressing me out and I don't want to be away from coding. As a side note, I have tried WordPress and I think it is truly amazing and thoroughly recommend it.

Anyway, today I would like to share some more code with you. While working on this blog, I found I needed something that would help me get a sense of what the finish post would look like while I typed, so I developed an editor using jQuery to do just that.

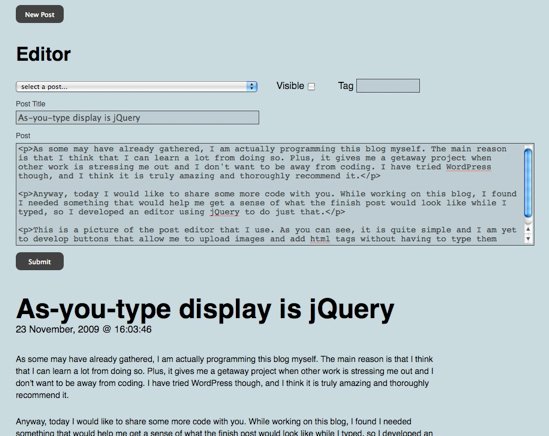
The picture below is of the post editor that I use. As you can see, it is quite simple and I am yet to develop buttons that allow me to upload images and add html tags without having to type them myself, but for now, it does what it was meant to.

Basically, below the input area is an output area which displays the the post as it will look once posted. The display area also updates on the fly as you type. I have written a small example below since I can't actually give you access to the editor for obvious reasons.

Type in the box and watch it get displayed below: (Note*30 letter limit)

Output:


I set up an input textfield with an id of "typerArea" and a p-tag with an id of "showType". If you are trying this, you will also have to download jQuery and place it in the same directory and the html file or whatever file type you are coding in. The jQuery code is as follows:

$(document).ready(function() {
   $("#typerArea").keyup(displayType);
				
   function displayType(){
      var contents = $("#typerArea").val();
 	$("#showType").html(contents);
   }
 });

As usual in jQuery, once the document is ready (line 1), the "typerArea" textfield is set up to receive a keyup event (line 2) so that after every keystroke (up state) the function displayType() (line 4) will fire. This in turn takes the contents of the typerArea textfield using jQuery's val() function and places it inside the variable 'contents' (line 5), which then gets passed as the HTML of the paragraph "showType". Quite straight forward stuff, but fun none-the-less.

If you are interested in downloaded the example file you can find that here

Firebug Debugging in TextMate

Mon Nov 16 12:13:56 2009

I do almost all of my coding in what I believe is the best text editor currently on the planet, and the best thing since sliced bread - TextMate.

It is so light, has the best features, including live preview and snippets, and can now be used to debug code such as JavaScript, PHP and even ActionScript 3 through Mozilla's Firebug

There are a lot of hacks and plug-ins around that allow you to debug in various ways, including as-you-type Terminal output, which is very cool indeed but something I will leave for another post. The method of debugging JavaScript that I am most impressed with so far is DocTyper's Firebug bundle for TextMate. You can get a copy here along with some more detail on the subject. But for now, just check it out and don't forget to turn on "Enable access for assistive devices inside "Universal Access" on the Mac System Preferences panel.

For ActionScript, check out the Flashbug extension of Firebug, which you can find by doing a simple search on the Mozilla Addons page. You will also need a copy of the Debug Flash Player which you can of course download from the Adobe Flash Player Downloads page. Next create a file called mm.cfg and place it in Library/Application Support/Macromedia/(file goes here), and then add the following lines of text to it and save.

TraceOutputFileEnable=1
ErrorReportingEnable=1

A file called Flashlog.txt will automatically be created in the directory Users/(your name)/Library/Preferences/Macromedia/Flash Player/Logs/(Flashlog.txt file found here) FlashBug will read from this file and display any trace statements inside FireFox, which I personally find very helpful.

As a quick side note, I just want to add that ActionScript people might also want to try and Google Sephiroth Flash Tracer extension for FireFox. If you aren't using FireFox you may want to check out Vizzy Flash Tracer which is a standalone tracer.

Anyway, that's all for now, so get debugging those applications!

AS3 Simple Grids

Sat Nov 14 16:16:16 2009

I have decided to share a class with you that I recently developed for an ActionScript project that required a grid layout of MovieClips. Making grids in AS3 isn't really that difficult, but the class I've developed will save me a lot of typing and since building grid layouts is something that I may do a lot more of in future projects it seemed like a sensible thing to do.

It is quite a simple class but may come in handy from time to time. Please feel free to edit the code and do as you will. It's usage is simple. Just import it, create however many instances of an object you want to have in your grid, and apply the public static function createGrid(); from the Grid class. In the example grid below I used dark grey, 40 x 40 px MovieClips

Get Adobe Flash player

Grid.createGrid(); The parameters are (1:StageObject, 2:Array, 3:{Object})

Instructions of Use

1. The StageObject is simple. Just pass the stage of the first MovieClip your are throwing inside the grid. This will give us the ability to call the public static method without instancing the class itself, which I always find beneficial and try to do when I can.

2. The Array should be an array of all the names of the objects you want to place inside the grid. Objects will be ordered in the same order as they are placed inside this Array.

3. The Object can contain any of the 4 options available, which include col, spaceX, spaceY, and centered. col receives a Number and defines the number of columns the grid should have. spaceX and spaceY also receive a Number and respectively control the vertical and horizontal spacing between each object inside the grid. In other words, they control how big the gaps are inside the grid. The final parameter center:Boolean gives the option to offset the grid to the right by half the width of each instance fed into the array, so that the grid appears centered. If no parameters are given (Note* curly brackets are required {} even without parameters), the grid will set to a default of a non-centered, 6-columns grid with 10px vertical and horizontal spacing

Example Code

Grid.createGrid(this, nameArr, {cols:10, spaceX:10, spaceY:10, centered:false} );

For more info, just take a look at the fully annotated example files I've set up. They can be downloaded here

I would love to hear your opinions about this, but since I don't normally share my code, please be gentle with any criticisms. If you would like to host this code on your own website, please make sure to credit back to yours truly. Happy grid making!

New Apple Magic Mouse

Fri Nov 6 00:18:04 2009

I have to admit that I am a very big fan of Apple. Anyone who owns an Apple computer will probably comment on how reliable they are. However, with that said, I have to confess that I never really been impressed by the quality of Apple mouse technology.

About a year ago, I procured with great delight an Apple 'Mighty Mouse'. At the time, I was using Illustrator an awful lot and the 360 degree scroll ability of the Mighty Mouse was very desirable. However, now I have to say it is a constant battle trying to keep the scroll-ball working. Sending it to Apple for a clean every few months (maybe more often) just to have it scroll again would be an immense pain in the proverbial backside, and taking it apart to clean those little roller things inside time after time just to have it cease up on you again is tiresome, time consuming and down right infuriating, especially considering the price one costs. Let's face it, Apple products aren't cheap and you would expect them to do what it says on the tin.

With the new Apple Magic Mouse it looks as though Apple has realized their mistake and have completely got rid of the scroll-ball design. The Magic Mouse will interpret user input such as swipe and scroll actions reminiscent of the Apple iPhone, which although gimmicky, will surprisingly shave import seconds off your user experience.

If and when I come around to purchasing one, I will undoubtedly write a review here. Until then you can find more info at the Apple Magic Mouse webpage

Most recent posts

  1. Flashcards Maker - the app the helps you learn in a flash
  2. Convert Font Suitcase to TTF in 3 Easy Steps
  3. Rain or Shine - Weather Forecast Available Now!
  4. Getting around Apple's silly rules for iOS 10
  5. Localising App Names for iOS and Android

Search site:

Apps by Ubacoda.com

Click the app icons to see more info


Archives

Categories